
Drone Photogrammetry for Buildings: 20 Tips for Repeatable Results
- Hammer Missions
- May 22, 2024
- 5 min read
Drone Photogrammetry has changed the way we capture and model terrain, objects, and structures. By mounting high-resolution cameras on drones, aerial imagery is captured from multiple angles, enabling the creation of 3D models which can then be used for detailed analysis. But buildings can represent a problem for some drone photogrammetry users.
Buildings come in all shapes and sizes and there are often multiple facades, obscure angles and tricky features to capture. It’s rare that you’ll ever be tasked with carrying out a drone survey under the same conditions twice. So how do you ensure repeatability? How do you make sure that your results come out right the first time, every time?
Capturing buildings of different shapes and sizes using drone photogrammetry requires careful planning and execution. Here are 20 tips to achieve the best results every time you fly:
1. Divide & Conquer
Divide the building into roof and facade components to help you to create the best flight-plan.
Later, these images can be combined in the post to process a unified 3D model.

2. Consider the Building Geometry
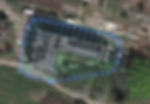
Capture the roof following the geometry of the building. This will help to reduce the amount of data required and increase the final model quality . For example, 'L' shaped roofs should use an L shaped polygon like the example below.

3. Capturing Short Buildings?
If you’re capturing a building which isn’t very tall, capture the facade using 1-3 rows around the building with an oblique angle so that most of the facade can be captured by the facade mapping mission. Here's an example!

For the full workflow, checkout this video.
4. Photogrammetry Tips for Tall Buildings
Inspecting tall buildings requires more effort. Split the building into 3 components - capture the roof first, then capture an orbit or lateral ring around the top of the building at an oblique angle, and finally, the facade.

For a full workflow for Inspecting Tall Buildings read this blog.
5. Face Value
If your inspection requires the facade only, capture a vertical grid of just the face of the building. Think of this as a regular grid mission flipped on its head.

6. What about dome-shaped structures or towers?
Hammer Missions photogrammetry software features a number of pre-planned missions. If you’re capturing a dome-shaped building, you’ll want to use our tower mapping mission, along with a 3D modelling workflow. This will ensure that your photos have enough overlap to create your detailed 3D model for inspection.

7. Dataset 1: The 3D Model
When you’re capturing your data you’ll need two different datasets - one for your 3D model of the subject and one for the finer detail. The photogrammetric 3D model will give you or the client a virtual representation of the target as it sits in its surroundings. This will enable you to pinpoint structural issues or features of interest as they look in the real world.

8. Dataset 2: The Inspection Images
The second dataset you’ll want to capture will be the nitty gritty. The gory details. Your inspection images are critical to conducting a thorough drone inspection and will make the difference between having a clear understanding of the condition of the building or asset or just a vague idea. You’ll want to ensure that your inspection images are sharp, clear and taken close to the building in good lighting conditions.
These inspection images can then be tagged and annotated in Hammer Missions to allow you to quickly and clearly share your findings with your client.

Find out more about combining your photogrammetry data with your inspection images in this video:
9. Consider Your Lighting Conditions
Avoid capturing images in harsh sunlight or extreme shadows, as this can result in overexposed or underexposed areas in the photos. Optimal lighting conditions are cloudy or diffused lighting, which provides even illumination across the building's surfaces. Ideally, all images should look as uniform as possible. Try not to use automatic exposure settings if possible!

10. Choose the Right Photogrammetry Drone Camera
Most drones come with a camera but this doesn’t mean it will be suitable for drone photogrammetry projects. Successful photogrammetry projects rely on high-quality images so your drone camera needs to be up to the job. You need a good, high-mega pixel camera.
Listen to or watch this episode of our Podcast to learn more about choosing the right drone photogrammetry camera:
11. Consistency is Everything
Use shutter priority or manual exposure so your image exposure doesn’t change during the flight. All photos should have consistent exposure, there’s no room for creativity here!
12. Get a Good Overlap
We CANNOT STRESS THIS ENOUGH! This is the amount your photos would overlap with one another if you printed them all out and pieced them together like a jigsaw. Photogrammetry software relies on the ability to spot commonalities between the images to stitch them together into a full image and 3D model.
Take a look at the example below:

13. Don’t Fly Too Close
Again, this is because photogrammetry relies on matching patterns across images. If you are too close to the subject there’s less chance of the software finding matches.
14. Don’t Fly Too Far Away
Get the right balance though as if you’re too far away from the subject your GSD will be too high and your 3D model will not show the detail you need.
15. The Importance of GSD in Drone Photogrammetry
Ground Sampling Distance or GSD will hugely impact the accuracy of your drone inspection data. If you’re unsure why GSD is important, watch as Varun runs your through the basics.
16. Don’t Forget Your Corners
This is an easy one to miss when you’re carrying out a more complex drone building inspection. Always make sure that building corners are captured properly and images overlap with each other. Otherwise, your 3D model won’t be complete.

17. The Bigger Picture
If you’re doing a drone inspection of an entire building, take care when creating the polygon for the roof. Ensure you capture a healthy margin outside the building of surrounding elements or features. This helps the photogrammetry software to match facade images taken from the top of the building to the facade images taken from the sides.
18. Don’t Use Zoom
Avoid flying with Zoom cameras or cameras that change focal length as this will again affect the consistency of your final data. Drone photogrammetry software cannot accurately match the overlap if your images are taken at different focal lengths.
19. Use the Right Drone Camera For Planning Your Mission
If your drone has different cameras make sure you create your flight plan with the one you intend to use for the inspection. For example, if your drone has 2 cameras - wide & zoom, ensure that you are planning your mission with the wide camera!
20. Use Ground Offset for Accurate Overlap
Use ground offset to capture the roof to get the right overlap! Hammer Missions features a Ground Offset option to manually set your parameters.

This handy guide will help you to get the ground offset right for every mission.
The Ultimate Drone Mapping Checklist
Want to know more? We’ve created the ultimate Drone Mapping Checklist to help you to streamline your drone photogrammetry missions.

With 15+ automated flight plans and sample datasets to play with, our 14 day free trial is a great way to get to grips with the software. Get Started Today.